Creating Scene and Interaction Technique
On this page, we provide tutorials for creating a scene and interaction techniques with our framework. The PDF-Version is available at our download section.
Content:
- Instructions for creating scenes
- Usage of techniques or scenes
- Instructions for creating an interaction technique
Instructions for creating scenes
The requirements are Unity version 5.5.1f and the BullsEye.unitypackages.
- Select your reality:
Depending on whether you want to create an augmented or a virtual reality scene you have two distinct prefabs which can be used.
- Augmented Reality
The AR prefab is used for augmented reality scenes. The prefab can be found in the Asset Folder under the data path Assets/BullsEye/Prefabs. To create a scene you need to drag and drop the prefab into the hierarchy. This will setup
every required render component (see Fig. 1.1). The AR prefab differs from the VR prefab by including a plane which acts as a screen and displays the real world as a video stream. If you switch to scene view you can see the basic AR scene setup, consisting of the camera and the screen to show the video stream of the real world. You are now set up to include your own objects into the scene to augment the reality displayed on the plane (see Fig. 1.2).
If you want to perform monocular eye tracking, select either left or right. If you want to perform binocular eye tracking, select both (see Fig. 1).
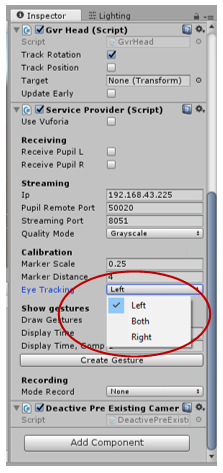
Figure 1: Calibration Setting in Unity
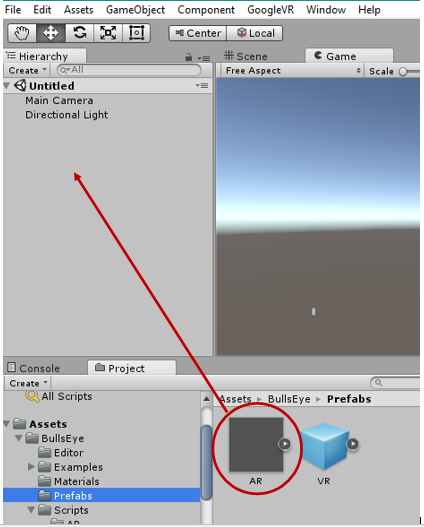
Figure 1.1: AR prefab
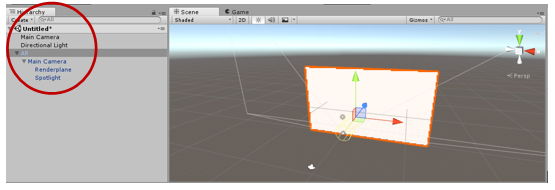
Figure 1.2: AR prefab structure
- Virtual Reality
The VR prefab can be used for virtual reality. The prefab can be found in the Asset Folder under the data path Assets/BullsEye/Prefabs. To create a scene you need to drag and drop the prefab into the hierarchy. This will setup every required render component (see Fig. 1.3). To create a virtual reality scene you simply need to create a new scene (see Fig. 1.4), but instead of dragging the AR prefab into the hierarchy as explained before, you will instead drag the VR prefab into the hierarchy. You are now ready to build your virtual world around the prefab. Fig. 1.5 show the VR prefab in an example virtual reality scene.
If you want to perform monocular eye tracking, select either left or right. If you want to perform binocular eye tracking, select both (see Fig. 1).
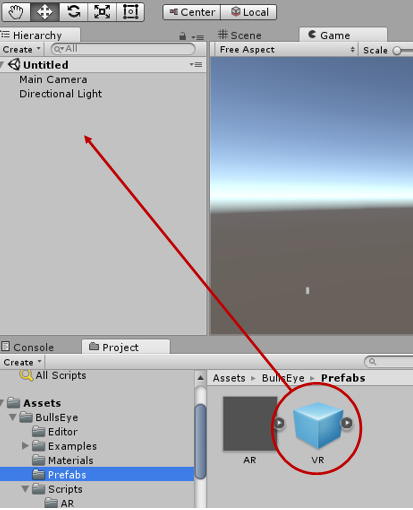
Figure 1.3: VR prefab
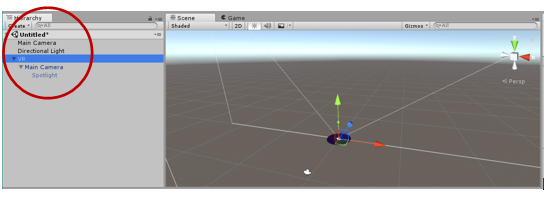
Figure 1.4: VR prefab structure
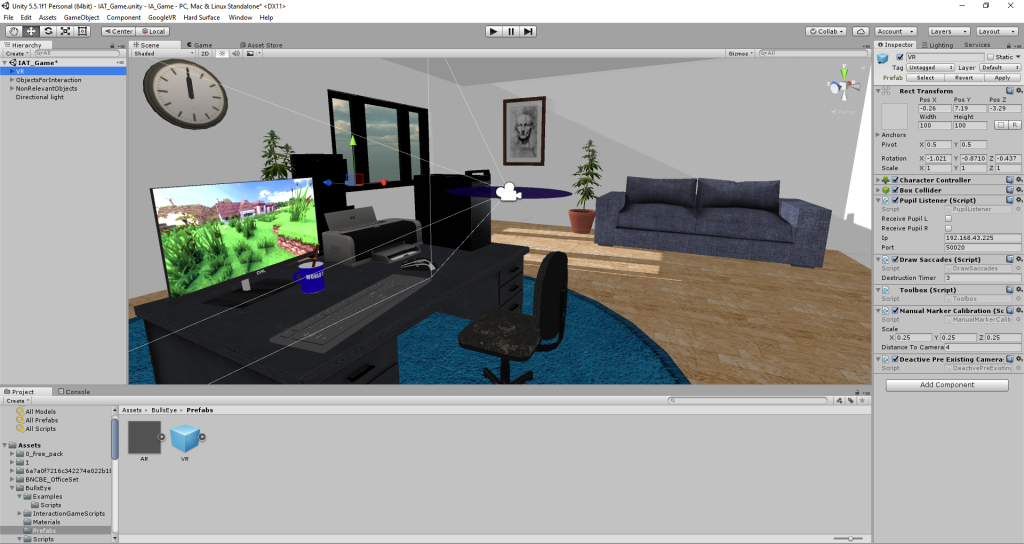
Figure 1.5: The VR prefab in an example VR scene
After creation your scene go to step Usage of techniques or scenes for use an existing example interaction technique or to step Instructions for creating an interaction technique for creation your own interaction technique.
Usage of techniques or scenes
In this chapter you can see all example interaction techniques. The following list will give you an detailed overwiew.
The example techniques are found in Assets/BullsEye/Examples/Scripts folder, the example scenes in the Assets/BullsEye/Examples/Scenes folder.
- Example interaction techniques
- Technique 01: FixationSizeChange
- A fixation interaction technique that alternates the size of the object between a given minimum size and a given maximum size while the object is being fixated.
- Technique 02: FixationColor
- A fixation interaction technique that changes the object’s color to a given color while it is being fixated.
- Technique 03: FixationColorChange
- A fixation interaction technique that smoothly changes the color from a given start color to a given target color while the object is being fixated.
- Technique 04: FixationDeletion
- A fixation interaction technique that deletes the object as soon as it is being fixated.
- Technique 05: AreaFixation
- An area-based fixation interaction technique that changes the object’s color while there is a fixation in the right hand side of the screen.
- Technique 06: GestureSpawnObject
- A gesture interaction technique that spawns a sphere in the user’s field of view every time a ’C’ gesture is drawn with saccades.
- Technique 07: PursuitSizeChange
- A pursuit interaction technique that alternates the size of the object between a given minimum size and a given maximum size while the object is being followed by the user’s gaze.
- Technique 08: PursuitColorChange
- A pursuit interaction technique that smoothly changes the object’s color from a given start color to a given target color while it is being followed by the user’s gaze.
- Technique 09: FixationPickupDrop
- A fixation interaction technique that lets the user pickup the object with their gaze, move it around for a given time and drop it again.
- Technique 01: FixationSizeChange
- Example scenes
- Scene 01: AR Search Game
- An AR scene in which the user has to search a floating sphere around them. After finding that sphere and fixating it it moves to a random position around the user.
- Scene 02: Towers of Hanoi
- A VR scene in which the user can play the game ’Towers of Hanoi’ using fixations to select the stack from which he wants to move a disk. The movement between the different stacks is implemented via gestures which are shown inside the scene.
- Scene 03: Pursuit Balloon
- An AR scene where the user has to follow a balloon with his gaze. If the user does this for a few seconds, the balloon will burst into pieces. During this period the ballon’s line symbolizes how close the ballon is to bursting. The shorter the line is, the closer the ballon is to bursting. After a short time the balloon reappears somewhere around the user and can be followed again.
- Scene 04: Balloons
- An AR scene using Vuforia. The user has to look at a marker and make a gesture to start a game were they have to pop ballons using fixations. There are ballons which mustn’t be popped because the user loses a life if should they destroy them. They also lose a life should the other balloons fly to far away. The game ends if the user ha no more lifes left. Additionally the user has access to a menu using a second marker to stop or restart the game or close the app entirely.
- Scene 01: AR Search Game
Instructions for creating an interaction technique
This section explains how to implement your own interaction technique using our framework. For creating your own technique please refer to the following instructions:
- Go in the project structur to Assets/BullsEye/Examples/Scripts and create by right click a new C# script. The name is up to you.
- Object interaction: Attach the newly created script to the object which you want to interact with.
- Not object related: If you want to create an interaction technique which is not object related, you should create a new empty game object and attach the script at it.
- This new script has to extend the MonoBehaviour class provided by unity and additionally implement one of the interfaces from our framework depending on which kind of interaction technique you want to create. Click in the inspector area on the right hand side at addComponent and search for your script by entering the name you choose. For open the script click on the right hand side at the gear. For import the interface methods click on “Import the missing members”, select all and finish (for fixation look at Fig. 3.1). When you use Visual Studio you need to delete the exceptions in the genereated classes (see in Fig. 3.2).
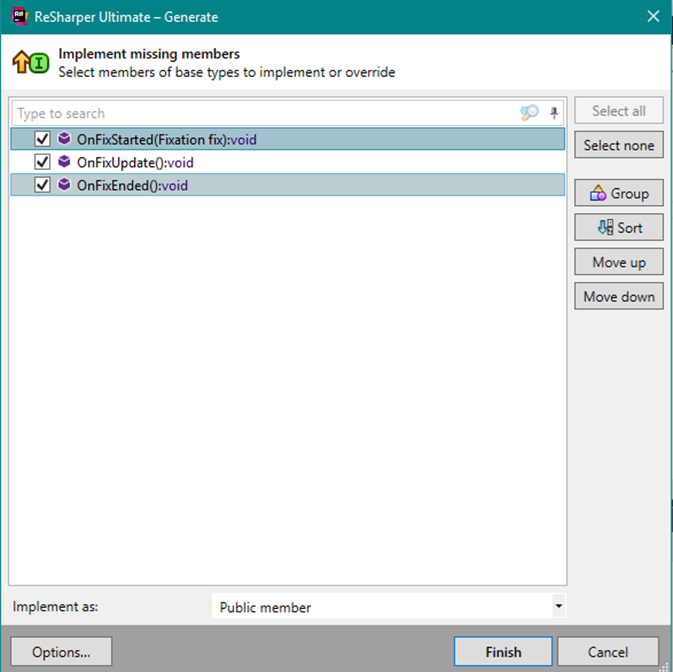
Figure 3.1: Missing imports
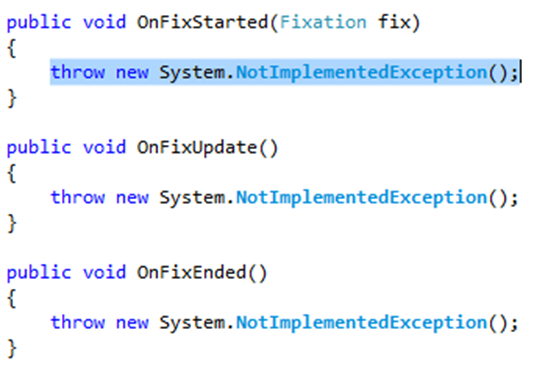
Figure 3.2: Exceptions
- Fixation technique
- If you want to create a fixation interaction technique, you’ll have to implement the IFixationInteractionTechnique interface (see in Fig. 3.3). This interface defines three methods:
- OnFixStarted which is called at the start of a new fixation and provides a Fixation object which contains information about the fixation, like the position on the screen.
- OnFixUpdate which is called every frame like the Update method provided by Unity, but just while the fixation is still ongoing.
- OnFixEnded which is called once the fixation ends.
- If you want to create a fixation interaction technique, you’ll have to implement the IFixationInteractionTechnique interface (see in Fig. 3.3). This interface defines three methods:
Figure 3.3: Class header after extending MonoBehaviour and implementing the IFixationInteractionTechnique interface
- Gesture technique
- If you want to create a gesture interaction technique, you’ll have to implement the IGestureInteractionTechnique interface (see in Fig. 3.4).
- Additionally you have to create a gesture which triggers the technique. Creating the gesture is using simplest the external tool GestureCreator (see in Fig 3.5) which generates the constructor for the entered gesture which you can easily copy to the Start method before the Subscribe method is called. You can find it in the Unity editor in the Assets/Editor folder.
Figure 3.4: Class header after extending MonoBehaviour and implementing the IGestureInteractionTechnique interface
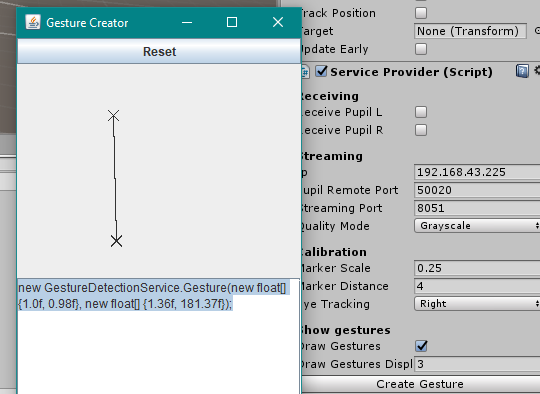
Figure 3.5: Gesture creator
This interface provides only the method OnGesture which is called every time the defined gesture is entered via fixations and saccades.
- Pursuit technique
- If you want to create a pursuit interaction technique, you’ll have to implement the IPursuitInteractionTechnique interface (see in Fig. 3.6). This Interface defines two methods, you have to implement:
- OnPursuitUpdate which is called every frame like the Update method provided by Unity. Via the parameter object you can get information about the current state of the pursuit.
- OnPursuit which is called as soon as the conditions from the subscribtion are met.
- If you want to create a pursuit interaction technique, you’ll have to implement the IPursuitInteractionTechnique interface (see in Fig. 3.6). This Interface defines two methods, you have to implement:
Figure 3.6: Class header after extending MonoBehaviour and implementing the IPursuitInteractionTechnique interface
- Service Provider
- Now call the ServiceProvider.Get method in the Start method inherited from the MonoBehaviour class and use either FixationDetectionService, Gesture-DetectionService, or PursuitDetectionService as the generic type. Figure 3.7 shows a Start method in which an interaction technique subscribes itself to the PursuitDetectionService. The services accept different parameters for their subscription methods with them you can further specify your wished behaviour.

Figure 3.7: Start method PursuitDetectionService
- The FixationDetectionService needs a reference to the script itself as its only mandatory parameter. Furthermore there are optional parameters with them you can specify whether you want the interaction technique only triggers if the GameObject the script is attached to is the target of the fixation, default
option for this parameter is true. As next parameter you can enter an array of to Vector2 objects to declare an area on the screen and only if the fixation is within this area or set it to null in which case this condition isn’t checked. No given array is the default option. The next parameter is the time in milliseconds for which all eye tracking data is checked for a possible fixation. The default parameter is 200 because it is the minimal time needed for the human brain to fixate an object. The latest parameter is the permitted deviation of gaze points during the prior defined time span in pixels. Higher values in this parameter cause more scattered gaze points to still trigger the interaction technique. The default value is 100 because our test showed that this value results in the most reliable detection of fixations (see in Fig. 3.8).

Figure 3.8: Start method FixationDetectionService
- The GestureDetectionService requires not only the reference to the script itself, but also the created gesture as parameters. The first optional parameter is the allowed deviation for angles between the angle specified in the gesture’s constructor and the entered angle via eye tracking data. It is given as percentage of 360 degrees. The default parameter is 0.05 which equals a deviation of up to 18 degrees to either side. The other optional parameter is the allowed deviation in length between defined and entered edges. It is given as percentage. The default parameter is 0.1 which results in edges having between 90% and 110% of the defined length are permitted (see in Fig. 3.9).
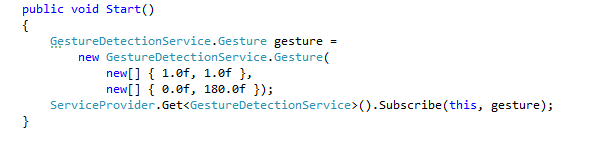
Figure 3.9: Start method GestureDetectionService
- The PursuitDetectionService also requires a reference to the script itself as its first parameter. The second mandatory parameter is the time the object has to be followed for the interaction to trigger. The last parameter is the correlation threshold. This threshold must be met before the interaction can be triggered, the default value is 0.9 (see in Fig. 3.7)